News
Hipot Test Can Be Simple
In the previous articles, we have delved into the significance of electrical safety and explored the latest international standards in industries, such as EV and Medical. We hope you have enjoyed the valuable insights that enhance your understanding of electrical safety testing. Many of you have noticed that the Hipot test is a crucial part of these standards and have asked about how to connect your Device Under Test (DUT) to the safety tester during this test. In this issue, we will address this question by providing a brief introduction to the Hipot test and guiding you through the fundamental configuration. We'll also share some valuable tips to ensure more precise testing. In the end, you'll feel confident in conquering this challenge!
Understanding the Hipot Test
The Hipot test, also known as the Dielectric Withstand Test or High-Potential Test, is a common electrical safety test mandated by international standards. Its primary purpose is to verify the insulation integrity of the DUT by subjecting it to a high voltage beyond normal operating levels for a specified period. This test also detects any weaknesses or insulation failures in the equipment. Ultimately, during this test, the DUT should not experience breakdown.
Getting to Know Your DUT
Prior to delving into the Hipot test configuration, it is crucial to have a comprehensive understanding of your Device Under Test (DUT)'s specifications, particularly its rated voltage. The rated voltage serves as a direct determinant for the testing voltage. For example, most standards recommend using a test voltage calculated as 2 times the product's rated voltage plus 1000V.
Making DUT Connections to the Testers
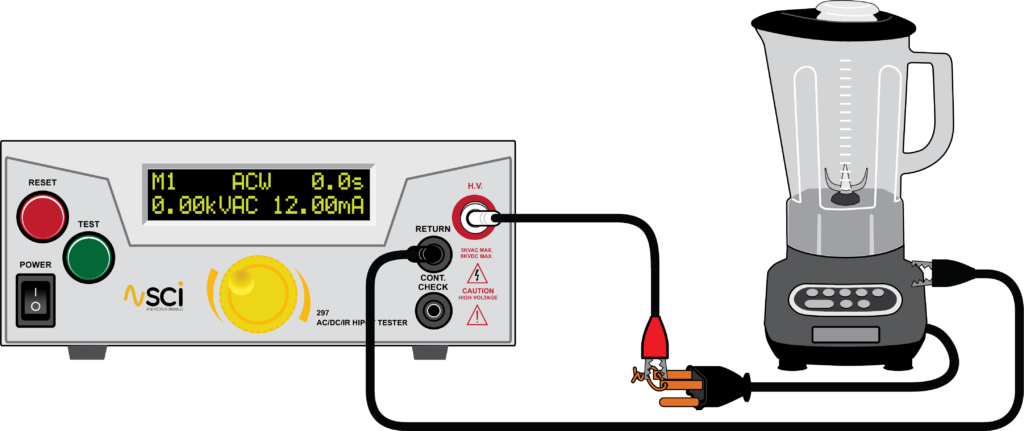
To perform the Hipot test, follow these steps for connecting the DUT to the testing instrument using two test leads: the high-voltage lead and the return lead:
- Insert the black ground return lead into the "Return" terminal.
- Plug the high voltage lead into the "H.V." (High Voltage) terminal.
- Attach the clip end of the high voltage lead to the current-carrying conductors of the DUT's circuitry (shorted line and neutral prong).
- Connect the clip end of the ground return lead to the exposed or dead metal chassis of the DUT.
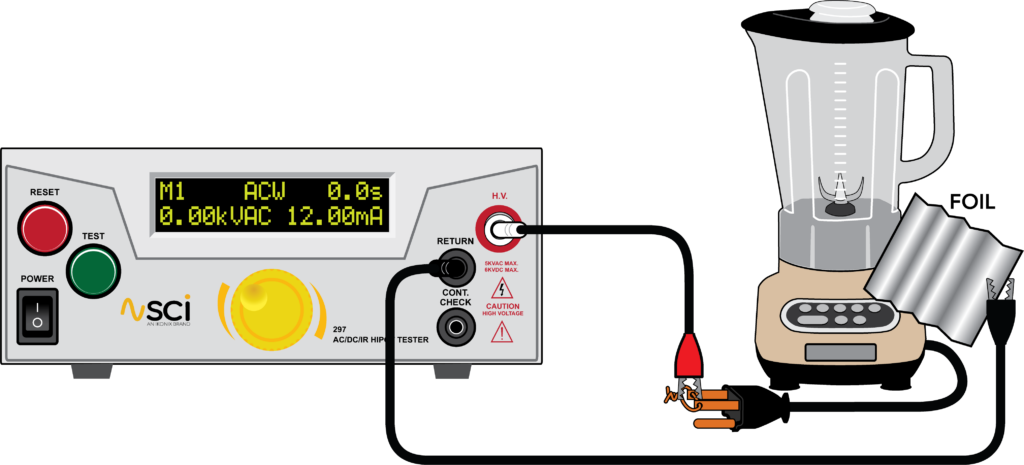
The above configuration is suitable for testing DUTs with an exposed metal chassis. If your chassis lacks any exposed metal, you can wrap the DUT's enclosure in foil and then connect the return lead to the foil. The diagram below shows how to connect the tester to the non-exposed metal chassis DUT.
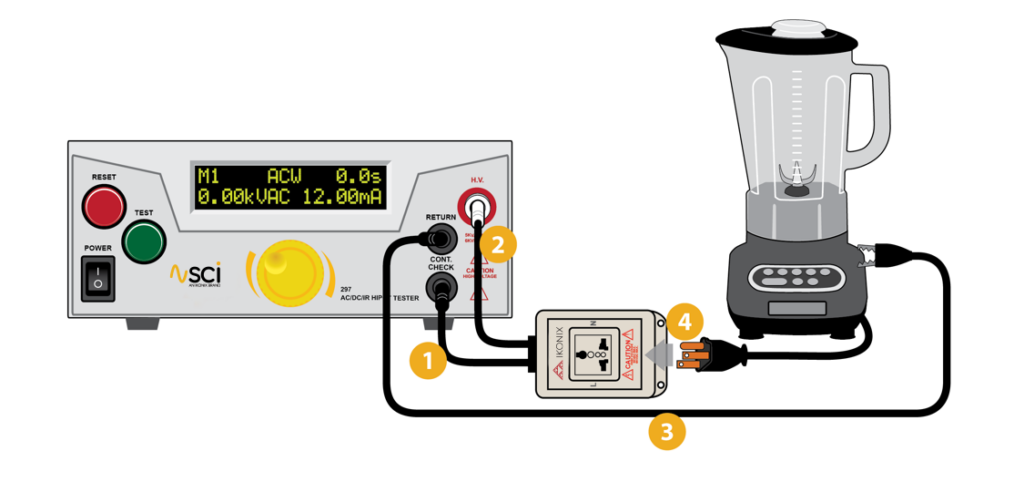
For added convenience, you can use an adaptor box to simplify the test setup. The diagram below shows how to connect the adapter box to the SCI 290 Hipot tester and the DUT.
Additional Tips for Precise Testing:
- Proper Accessory Selection: Never underestimate the importance of proper accessory selection. High-quality and compatible accessories, such as test leads and adapter box, are crucial for obtaining accurate test results and ensuring the safety of the operator during electrical testing. Using improper or unapproved accessories can pose serious hazards, jeopardizing the operator's well-being, and potentially causing damage to the tester and equipment. (Click here to learn mor about accessory.)
- The Power of Calibration: Ensure your tester delivers precise measurements through regular calibration. This involves comparing a device's readings to a known standard, identifying any deviations, and making necessary adjustments for accuracy and reliability.
- Prioritize Electrical Safety: Safety should always come first! Equip the right safety tester and adhere to safety standards to create a productive and secure testing environment. Don't forget to wear the necessary personal protective equipment (PPE) to ensure your safety and that of your team.
- A Right Tester: Hipot testing can be complex or simple depend on your application. Ikonix offers a range of electrical safety testers that are simple and easy to use to meet your needs. If you're in need of a compact, easy-to-use simple testing Hipot tester, the SCI 290 Series Hipot Tester is a perfect fit. It’s simple and intuitive knob operation allows you to set the testing parameters quickly, ensuring precise measurements and product safety. On the other hand, for those looking for advanced features in dealing with complex testing methods, Associated Research (AR) electrical safety testers are an excellent choice. AR's HypotULTRA® and Hypot® models are designed with a user-friendly touch panel and more, ensuring straightforward testing operations and high work productivity. Additionally, AR's HypotMax® offers an ultra-high output voltage of 20kV, making it ideal for special Hipot testing needs.
- Application Consulting Service: If you or your team is new to conducting Hipot tests or facing specific testing challenges, seeking the expertise can be extremely beneficial. The application consulting services offer valuable guidance on test theory and procedures, providing hands-on training to help you become familiar with the testing process. Collaborating with Ikonix's experienced consultants significantly improves the efficiency and effectiveness of your testing endeavors.
In this issue, we discussed the most commonly required Hipot test configuration by electrical safety testing standard. this information has empowered you with the knowledge and confidence to successfully connect your DUT to the electrical safety tester. However, it's worth noting that certain standards demand more intricate Hipot testing setups. In the upcoming issue, we will guide you through the setup process and offer testing solutions for such scenarios. If you have any further questions or need assistance, please contact our sales representative. Happy testing!
The attached file